Tutorials
Getting started with libmapper and Pure Data
To start using the libmapper with Pure Data you will need to:
- Install libmapper for your platform (Linux, OSX, Windows)
- Download the
[mapper]external object from our downloads page. Alternatively, you can build the object from source instead. - Download a graphical user interface for creating and editing mapping connections.
Devices
Creating a device
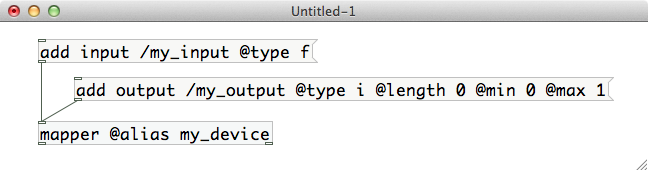
To create a libmapper device, it is necessary to provide a device name to the
[mapper] object using the property @alias. There is a brief initialization
period after a device is created where a unique ordinal is chosen to append to
the device name. This allows multiple devices with the same name to exist on
the network. If no name is given libmapper will choose a name for your device
starting with the string "puredata".
If desired, a device definition file can be specified with the property
@definition or @def, which the external will use to add signals to your
device. Otherwise, you device will start with no inputs or outputs and you will
need to add them using messages. In this tutorial, we will assume that you do
not have a prepared device definition file.
A third optional parameter of the [mapper] object is a network interface name.
By default, libmapper will try to guess which network interface to use for
mapping, defaulting to the local loopback interface ethernet or wifi is not
available. You can force the object to use a particular interface by using the
@interface property.
An example of creating a device:

Once the object has initialized, it will output its metadata from the right outlet:
- The complete device name, including an appended ordinal for distinguishing between multiple active devices with the same name.
- The IP address and port in use by the object.
- The number of input and output signals associated with the object.
- The network interface in use by the object.
Signals
Now that we have created a device, we only need to know how to add signals in
order to give our program some input/output functionality. While libmapper
enables arbitrary connections between any declared signals, we still find it
helpful to distinguish between two type of signals: inputs and outputs.
outputssignals are sources of data, updated locally by their parent deviceinputssignals are consumers of data and are not generally updated locally by their parent device.
This can become a bit confusing, since the "reverb" parameter of a sound
synthesizer might be updated locally through user interaction with a GUI,
however the normal use of this signal is as a destination for control data
streams so it should be defined as an input signal. Note that this distinction
is to help with GUI organization and user-understanding – libmapper enables
connections from input signals and to output signals if desired.
Creating a signal
We'll start with creating a "sender", so we will first talk about how to update output signals. Creating a signal requires two pieces of information:
- a name for the signal (must be unique within a devices inputs or outputs)
- the signal's data type expressed as a character 'i' for
integer, 'f' forfloat
Additional signal properties can also (optionally) be added:
- the signal's vector length
- the signal's unit
- the signal's minimum value
- the signal's maximum value
examples:
The only required parameters here are the signal name, and data type. If no
length property is provided, the signal is assumed to have length 1. Finally,
supported types are currently 'i' or 'f' for int or float values,
respectively.
The other parameters are not strictly required, but the more information you
provide, the more the mapper can do some things automatically. For example, if
minimum and maximum are provided, it will be possible to create
linear-scaled connections very quickly. If unit is provided, the mapper will
be able to similarly figure out a linear scaling based on unit conversion
(centimeters to inches for example). Currently automatic unit-based scaling is
not a supported feature, but will be added in the future. You can take
advantage of this future development by simply providing unit information
whenever it is available. It is also helpful documentation for users.
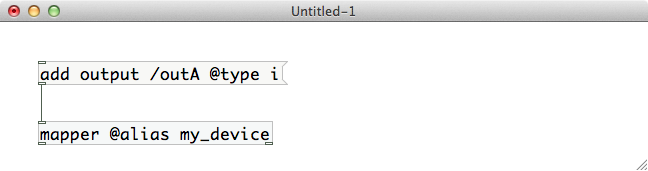
An example of creating a "barebones" int scalar output signal with no unit,
minimum, or maximum information:
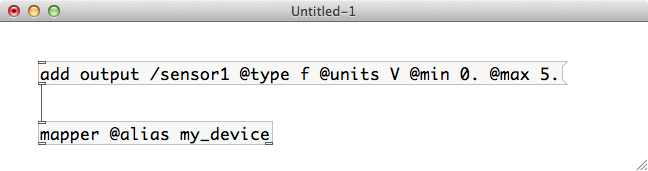
An example of a float signal where some more information is provided:
So far we know how to create a device and to specify an output signal for it.
Updating signals
We can imagine the above program getting sensor information in a loop. It could be running on a computer and reading data from an Arduino over a USB serial port, or it could just be a mouse-controlled GUI slider. However it's getting the data, it must provide it to libmapper so that it will be sent to other devices if that signal is mapped.
This is accomplished by passing messages to the [mapper] object starting with
the signal name:
(<signal_name> <value>)
    |
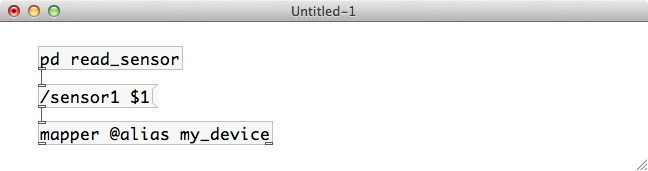
So in the "sensor 1 voltage" example, assuming that we have some code which
reads sensor 1's value into a float variable in [p read_sensor], the patch
becomes:
This is about all that is needed to expose sensor 1's voltage to the network as a mappable parameter. The libmapper GUI can now be used to create a mapping between this value and a receiver, where it could control a synthesizer parameter or change the brightness of an LED, or whatever else you want to do.
Signal conditioning
Most synthesizers of course will not know what to do with "voltage"--it is an electrical property that has nothing to do with sound or music. This is where libmapper really becomes useful.
Scaling or other signal conditioning can be taken care of before exposing the signal, or it can be performed as part of the mapping. Since the end user can demand any mathematical operation be performed on the signal, he can perform whatever mappings between signals as he wishes.
As a developer, it is therefore your job to provide information that will be useful to the end user.
For example, if sensor 1 is a position sensor, instead of publishing "voltage", you could convert it to centimeters or meters based on the known dimensions of the sensor, and publish a "/sensor1/position" signal instead, providing the unit information as well.
We call such signals "semantic", because they provide information with more meaning than a relatively uninformative value based on the electrical properties of the sensing technique. Some sensors can benefit from low-pass filtering or other measures to reduce noise. Some sensor data may need to be combined in order to derive physical meaning. What you choose to expose as outputs of your device is entirely application-dependent.
You can even publish both "/sensor1/position" and "/sensor1/voltage" if desired, in order to expose both processed and raw data. Keep in mind that these will not take up significant processing time, and zero network bandwidth, if they are not mapped.
Receiving signals
Receiving signals is even easier: after adding an input using the add input
message, updates for this signal will be routed to the left output of the
[mapper] object. Let's try making two devices in the same patch for testing.
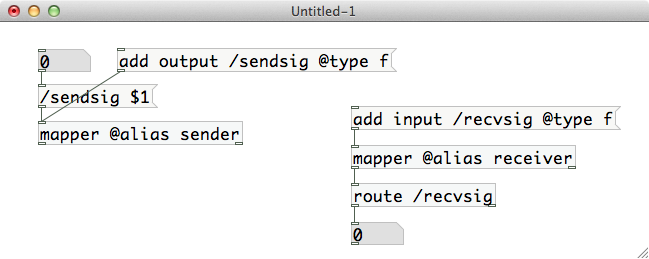
If you use your mapping GUI to create a map between your two signals sendsig and recvsig, any change made to the float value on the left will cause a corresponding output on the right.
Congratulations - you have created your first mapping connection! This probably seems quite simplistic, since you could have made a patch-cord between the two float objects and accomplished the same thing, but your "mapping" represents something more:
- It can be edited remotely from another machine on the network.
- It can connect signals on different computers.
- It can connect different signals implemented in different programming languages such as C, C++, Python, Java, and SuperCollider.
- It can be edited to provide signal processing, including automatic linear scaling, calibration, muting, clipping, or an arbitrary expression - even FIR and IIR filters.
Learn mode
For patches with only outputs, lazy users can also declare the signals
automatically using learn mode. You can either send the message "learn 1" to
turn on learning ("learn 0" to turn it off) or you can instantiate your
[mapper] object with the learn property set as an argument:
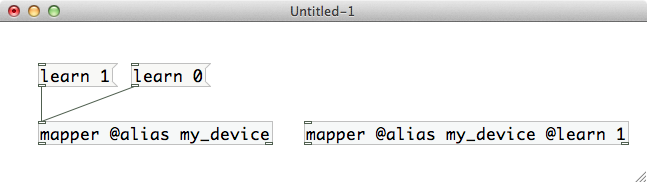
the object will watch its inlet for messages formatted as <name> value(s) and
add any unknown signals automatically. Signals added this way will not have
associated minimum or maximum values, however, so it is usually recommended to
add the signals explicitly using messages.
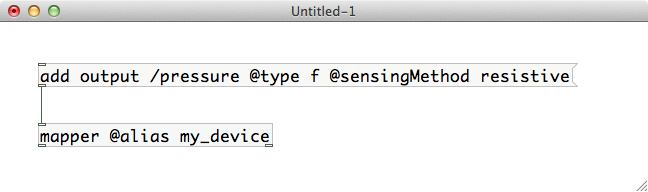
Publishing metadata
Things like device names, signal units, and ranges, are examples of metadata--information about the data you are exposing on the network.
libmapper also provides the ability to specify arbitrary extra metadata in the form of name-value pairs. These are not interpreted by libmapper in any way, but can be retrieved over the network. This can be used for instance to label a device with its location, or to perhaps give a signal some property like "reliability", or some category like "light", "motor", "shaker", etc.
Some GUI could then use this information to display information about the network in an intelligent manner.
Any time there may be extra knowledge about a signal or device, it is a good idea to represent it by adding such properties, which can be of any OSC-compatible type. (So, numbers and strings, etc.)
The Pure Data bindings for libmapper do not currently allow dynamically changing the properties of a device or signal, however they can be declared when the entity is created by using jitter-style property arguments
For example, to store a float indicating the X position of a device dev, you
could instantiate your object like this:

To specify a string property of a signal:
Reserved keys
You can use any property name not already reserved by libmapper.
| Object | Reserved keys |
|---|---|
| All | data, description, id, is_local, name, status, version |
| Device | host, libversion, num_maps, num_maps_in, num_maps_out, num_sigs_in, num_sigs_out, ordinal, port, signal, synced |
| Signal | device, direction, ephemeral, jitter, length, max, maximum, min, minimum, num_inst, num_maps, num_maps_in, num_maps_out, period, rate, steal, type, unit |
| Maps | bundle, expr, muted, num_destinations, num_sources, process_loc, protocol, scope, signal, slot, use_inst |